Saturday, October 18, 2008

10/18/2008 HDR tutorial- Photoshop CS2- CS3

Many of my students are asking me how to create the HDR (High Dynamic Range) Photography you often see on the Internet. After discussing this in class and showing a bunch of examples, I figured that those of you with Photoshop at home deserve a lesson on how to do it yourself. This is a simple tutorial on how to use the function that many versions of Photoshop provide you with.
For an amazing tutorial click here http://www.photoshopcafe.com/tutorials/HDR_ps/hdr-ps.htm.

Here is my version- Let's begin!

Select a scene that has a high contrast in value- typically found in direct lighting. Bracketing ensures that you have a shot balanced for the highlights, one for the mediums, and the last for the darks.
You will need to begin with a bracketed set of exposures. You can set your camera to auto bracket (AEB +/- , which stands for auto exposure bracket). I recommend setting it 1-2 full stops (depending on the level of contrast).
To bracket manually simply find your balanced exposure, snap a shot then overexpose by one or two stops, snap, and then underexpose by one or two stops and snap. The photos will need to be EXACTLY the same frame- I recommend using a tripod if your camera doesn't have the swiftness of the AEB function. Hold still if you are using this function!


Exposed for the shadows
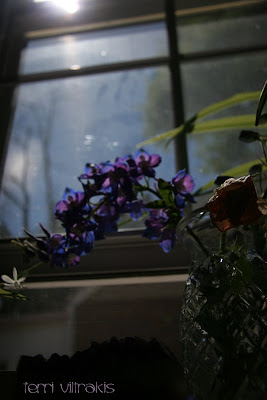

Exposed for the highlights


Exposed for the mid tones

Next- open all three exposures in Photoshop.

Click on File> Automate>merge to HDR.

Add open files button and click OK...

Here you can play with your histogram settings to achieve the results you want. Be careful not to blow out the highlights- there are other steps you will follow to affect your results. You arent done with this yet!

After merging to HDR- set your histogram so that the highlights aren't blown out and hit OK. You will see an unflattering dark image.

**If you want to finish editing now you can skip ahead to the convert to 16 bits step or you can get a lot more versatility by following the instructions on Photomatix tone mapping here:
-You can download additional software http://www.hdrsoft.com/download.html called Photomatix tone mapping. This allows you to control many more aspects of the image from luminosity to saturation of the shadows, mids, and highlights. There is a free trial available at the link above.

Load it into your filters menu.


Go to your filters menu- click Photomatix and then tone mapping.

A screen with many sliders will pop up and you will be capable of adjusting color saturation, contrasts, shadows, mid tones, and highlights, etc. You need to develop an eye for keeping the photo real and yet still impressive. If you over-do HDR it will look totally faked. You want it on the verge of reality (to the max without crossing a line).

**Regardless of whether or not you have use the Photomatix tone mapping or not,
You will need to convert your image back to 16 bits. This will give you greater versatility in changing the finished results.

Go to Image> mode> 16 bits.

When you do this you will get to make a final set of adjustments in exposure and gamma. Those sliders are a bit too extreme for me, I like to adjust the tonal curve by clicking the drop-down menu next to method, selecting local adaptation, and adjusting the curve on the histogram so that I get the desired effect of color and contrast. Again, don't overdo it!!!

Here is the HDR version...


If you have older versions of Photoshop or even if you have Gimp (free photo editing software avb. at http://www.gimp.org/downloads/), you are still capable of achieving similar results.

The same instructions for this Gimp tutorial apply to older versions of Photoshop as they are close in what they do with slight variations on where to find the functions. Familiarize yourself with the settings!

For Gimp:

Use a tripod and be sure your photos are perfectly the same with no motion blur or the result will look blurry! See above for how to bracket.

http://www.instructables.com/id/HDR-photos-with-the-GIMP/

Tuesday, August 26, 2008

082608 The heART factory is open for business!!!

This awesome location is in the heart of Maineville- located across from the fire station on Foster-Maineville near the corner to rt 48. Just wait until you see the inside!
Lynn Hastings is a highly qualified art educator and a magnificent artist specializing in drawing painting and jewelry. She is offering a wide range of art enrichment classes for people of all ages. Register now at www.theheartfactory.com or call 513-253-6495 to sign up for these amazing classes!
Lynn is one of my closest friends and I have been fortunate enough to learn the tricks of this trade from her. Take advantage of this amazing opportunity to foster the artistic talents we know you are capable of. Morrow and Maineville Ohio are lucky to have her here- she is one of a kind in this community!
This band is amazing! Josh Pilot band rocked out in the heat and really drew in the crowd last Sat.
Just a few finishing touches and the space is complete. It is already so fabulous!
The ice cream social was a BIG hit! There were a ton of visitors - be sure to schedule your classes early!


This amazing table is made from a door, epoxy, and crayons! Too cool! She is so creative!

Visit www.theheartfactory.com for more info on classes and registration!!!

Tuesday, August 5, 2008

080508 Hocking Hills camping trip (0726-072708)

These two shots are from my amazing husband- Nicholas Viltrakis (http://www.nicholasviltrakis.blogspot.com/). Each year a group of our friends goes camping. This year we visitied the Hocking Hills region in central Ohio and it is awe inspiring. The whole place was filled with caves, gorges, waterfalls, and huge rock formations. Go check it out if you like nature and haven't seen this place!

Here I am in the obligatory campfire/flashlight shot... To set the mood.
Here was our campfire.... Nicholas has been toying with long exposures. The flashes you see are from his speedlight. He ran around the group flashing in the 13 sec it took to expose this image. Neat huh?

These photographs below were taken by me with my trusty purse camera the Canon SD1000. You can see the big difference in exposure when shooting with a point and shoot seen vs. an SLR right here. I miss my big camera big time! I'm so excited to upgrade- I'm getting Nicholas' 30D and he gets the 40D as soon as it arrives.
Here is Nicholas...
This is Jenny, Marshall, and Nicholas in Ash Cave.

There is a waterfall (tiny) right in the center and the sandstone is so soft you could carve it with your fingernail...


Looking up from around the campfire.
Sparklers!!!


080508 The day my camera died (071808). RIP 20D

So I got the 'error 99' about 30 sec after my beautiful sister shot this wonderful image. It was a tragedy. My 20D would not stop snapping it's shutter. Even after it was turned off. The only way to stop the incessant snapping was to take out the battery. Nothing I could do worked to solve the issue. When we got home and checked some posts online we discovered it is a typical issue with the 20D. The shutter has a lifespan-and since mine was bought used from a prominent photographer (David Ziser http://www.digitalprotalk.blogspot.com/) we decided the camera was just suffering from old age. This error costs about $200 to fix so we decided to upgrade to the new 40D instead. If anyone is interested in a cheap broken 20D let me know!

080508 Family vacation to the Poconos (071308-072108)

This is my family- the cousins on the Brandon side that is (plus 2). We have been traveling together since we were young. Thank you Nikki for all your careful planning! The Poconos are in eastern Pennsylvania and consist of a string of beautiful wooded areas, lakes, and mountains. It used to be a hot honeymooner destination for people looking to escape the cities. It is still fabulous. I think that in the fall or winter it would be remarkable! The weather was perfect for us. Hot enough to swim in the daytime and cool enough for a jacket at night. It was a quite a trek to get there from Cincinnati, but the area was luscious and secluded. A very nice and relaxing trip was had by all. It was great to reconnect with everyone as adults. We have always been close and hopefully always will be.


This is our view of the lake from the big back deck. This is Lake Natalie. The deer were like pigeons here. They practically ate from our hands. It was cute. We named our frequent visitor 'Tinkles'. (Check out http://www.nicholasviltrakis.blogspot.com/ for photos of Tinkles).


The blueberry bushes were everywhere! We picked so many and make plenty of blueberry pancakes, yum!

It was a prime spot to meditate and relax. I love being outdoors and it was a beautiful breezy atmosphere! (Summer breeze- make me feel fine)


My brother, Steve, was training for a triathlon. He swam across the lake. He kinda had to walk halfway because it was so shallow.
He placed something like 36th out of 250 in his class in the New Jersey triathlon, btw. Go Steve!

Nicholas is always picking me flowers. I love him so...

We rowed all around Big Bass Lake. It was a super fun excursion. We had a beautiful time.

We came upon an island, it was fantastic from afar. We decided to dock and conquer.

We discovered it was covered with goose turds and really sticky flowers. Needless to say- we were scrubbing our feet for days. It was so named 'Goose Turd Island'.


Later in the week we went to a place called Bushkill Falls. It was a really cool spot to visit. We hiked up and down the falls- there were 8 total.


Monday, July 7, 2008

070708 My trip to APSI at CCAD (0621-28)

APSI= Advanced Placement Summer Institute... CCAD= Columbus College of Art and Design

I basically spent a week at CCAD learning new art tricks, creating in a studio like I expect my students in AP art to work, learning the ins and outs of the AP portfolio process, and exhibiting my work alongside my art teacher peers. It was an amazing experience- the folks at CCAD really went above and beyond- they even let us use free art supplies! We got lots of cool treats and I renewed my love for my job here.
We learned encaustics. Totally awesome way to paint with pigment and beeswax. Very fun.
This is my studio space. I haven't actually finished the 2nd painting I was working with here.
It stormed really hard while people were in the studio- I thank God I was staying with Amanda and not on campus (people were stuck without power there and lightning actually struck the studio!). I ignored the sirens and took some sweet lightning photos!

These are some of my favorites from the other teachers...


The following 2 are examples from the students at CCAD:


We evaluated student portfolios. This is a fake (sample) portfolio of quality. It would have scored a 5 (scale is 1-5).

I made the painting of the trees/ relfections below... We created a lot that week in the studio. I made like 10 pieces. This is a quality oil painting.
These folks worked very hard for us.

Pride and the Commfest were the following weekend:
I got to hang out with good friends and celebrate a challenging week. It was a really fun and rewarding experience.